How to auto stop and auto start AWS EC2 instances using AWS Lambda
In our previous articles we learned how to create and launch and AWS EC2 instance and how we can connect it from your computer using the SSH protocol like PuTTY and how to assign Elastic IP to our EC2 instance. In this article we will learn how to automatically stop and start an AWS EC2 instance using AWS Lambda, we'll create Lambda function that stop and start your EC2 instances. This function will use Instance tags to identify which instances needs to be start and stop at intervals or certain times that you specify. Then, we'll create CloudWatch events that trigger your functions at intervals or certain times that you specify. You can find the complete video tutorial from this link
Prerequisites
* You need an Amazon Web Services Account.
* You need a created & launched EC2 instance to connect to. Instructions for this section can found in here.
Tagging Instances
Note: Tag all the instance which needs to be auto stop and auto start. Here in this article I have used this tagging’s.
1
2
3
Region = ap-southeast-1 (Singapore)
Name = AutoStart ; Value = True (To start the instances)
Name = AutoStop ; Value = True (To stop the instances)
1 | Region = ap-southeast-1 (Singapore) |
Create IAM role for Lambda
First step is you need to create an IAM role for your Lambda function which will responsible for managing the EC2 instance's lifcycles like starting and stopping. To create an IAM role, you need to follow the steps below:
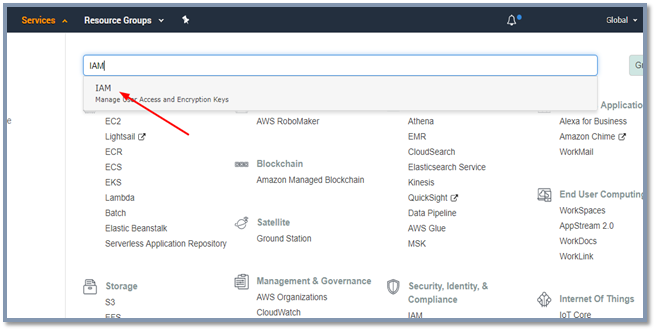
- Navigate to Services in AWS console and click onIAM
- Click on Roles in left side navigation panel
- Click on Create role
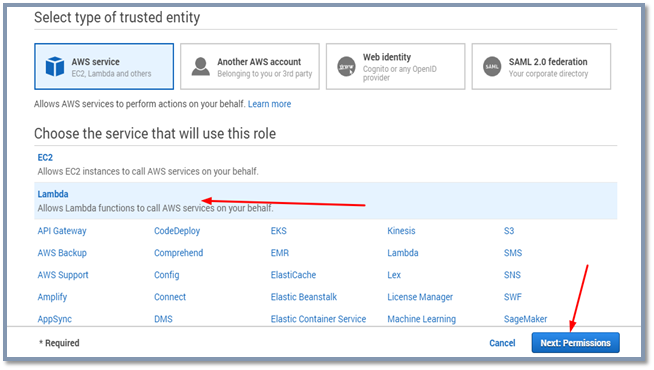
- Select Lambda from the list of AWS Service
- Click Next:Permission
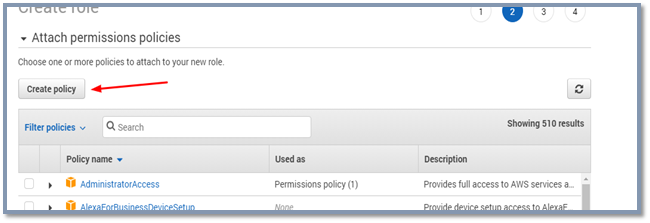
- Now you need to click to Create policy. It will pop up a new window. (Here we’ll create new custom ploicy for our Lambda function)
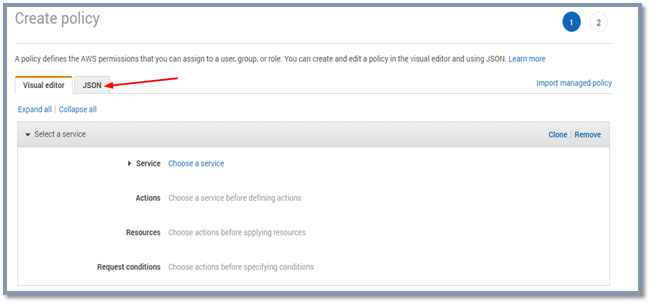
- Click on JSON tab. Remove default code and add paste below json data
1
2
3
4
5
6
7
8
9
10
11
12
13
14
15
16
17
18
19
20
21
22
23
24
25
{
    "Version": "2012-10-17",
    "Statement": [
        {
            "Effect": "Allow",
            "Action": [
                "ec2:StartInstances",
                "ec2:StopInstances"
            ],
            "Resource": "arn:aws:ec2:*:*:instance/*"
        },
        {
            "Sid": "VisualEditor1",
            "Action": [
                "logs:CreateLogStream",
                "ec2:DescribeInstances"
                "ec2:DescribeTags"
                "logs:PutLogEvents"
                "logs:CreateLogGroup"
                "ec2:DescribeInstanceStatus"
            ],
            "Resource": "*"
        }
    ]
}
Click on Review Policy
Then add policy name as lambda_stop_start_ec2_policyand description of the policy and then click on create policy
Now you should come back to the previous tab where we creating the Role
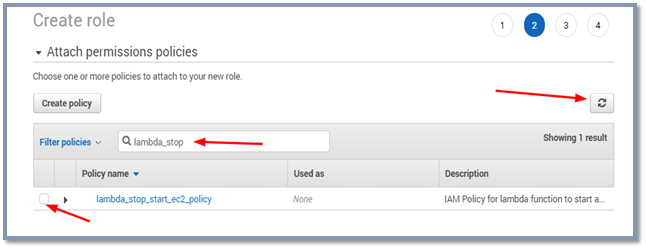
Here you search and select the new policy which we just created
lambda_stop_start_ec2_policy. (click on Refresh button available on top right first).
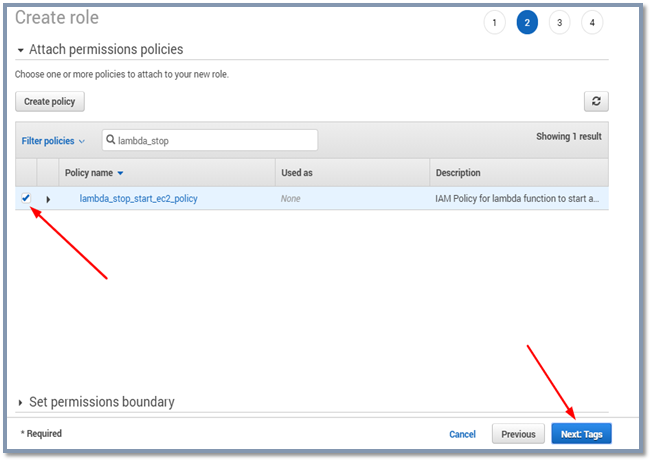
Click Next:tags and then Next:review. Now on review page enter Role name as lambda_stop_start_ec2 And some description of the role.
Now click on Create role.
New role has been created with EC2 start and stop permission with some additional CloudWatch logs permission.
1
2
3
4
5
6
7
8
9
10
11
12
13
14
15
16
17
18
19
20
21
22
23
24
25
{
"Version": "2012-10-17",
"Statement": [
{
"Effect": "Allow",
"Action": [
"ec2:StartInstances",
"ec2:StopInstances"
],
"Resource": "arn:aws:ec2:*:*:instance/*"
},
{
"Sid": "VisualEditor1",
"Action": [
"logs:CreateLogStream",
"ec2:DescribeInstances"
"ec2:DescribeTags"
"logs:PutLogEvents"
"logs:CreateLogGroup"
"ec2:DescribeInstanceStatus"
],
"Resource": "*"
}
]
}
Click on Review Policy
Then add policy name as lambda_stop_start_ec2_policyand description of the policy and then click on create policy
Now you should come back to the previous tab where we creating the Role
Here you search and select the new policy which we just created
lambda_stop_start_ec2_policy. (click on Refresh button available on top right first).
Click Next:tags and then Next:review. Now on review page enter Role name as lambda_stop_start_ec2 And some description of the role.
Now click on Create role.
New role has been created with EC2 start and stop permission with some additional CloudWatch logs permission.
Create Lambda function to Stop Instance
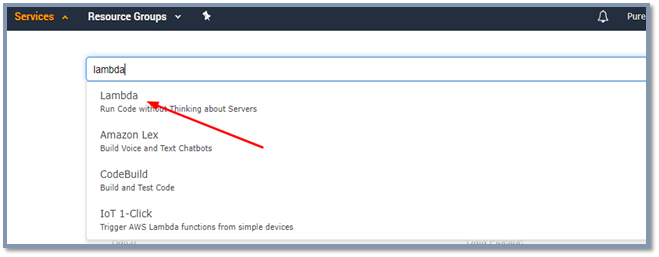
Click on services then Lambda
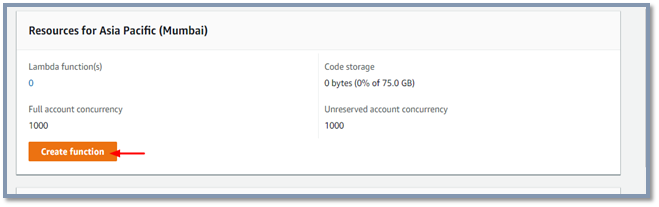
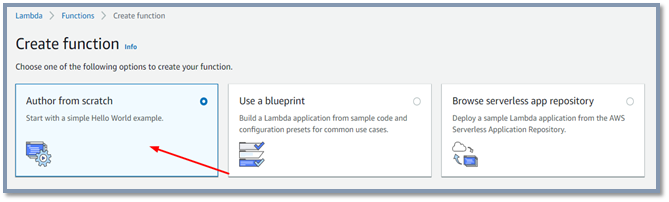
Click on Create new function.
Then Select Author from scratch
Under Basic information tab enter Function Name as AutoStopEC2Instance and select runtime as Python 3.7.
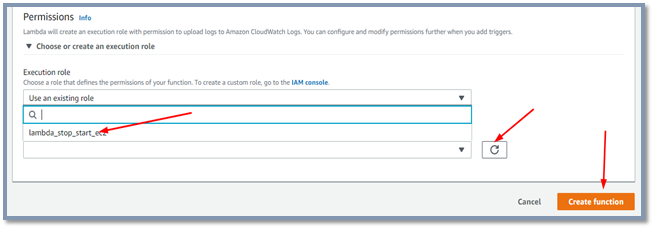
Click on Choose or create an execution role to expand.
Under Execution role select Use an Existing Role and select the role lambda_stop_start_ec2 which we have created in previous step and click on Create function.
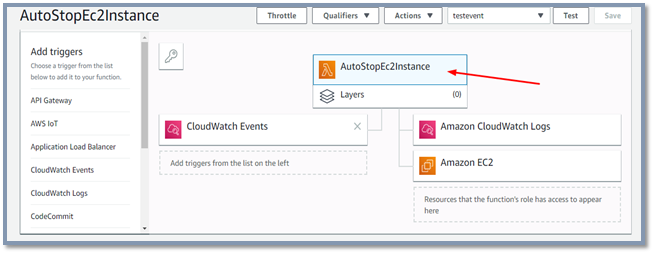
Lambda Designer will open scroll down where you can find Function Code.
Under Function code you will find an inline editor with lambda_function.py. Delete the content of the file and paste below code.
Note: For region, replace “ap-southeast-1” with the AWS Region your instances are in
1
2
3
4
5
6
7
8
9
10
11
12
13
14
15
16
17
18
19
20
21
22
23
24
25
26
27
28
29
30
31
32
33
34
35
36
37
38
import boto3
import logging

#setup simple logging for INFO
logger = logging.getLogger()
logger.setLevel(logging.INFO)

#define the connection and set the region
ec2 = boto3.resource('ec2', region_name='ap-southeast-1')

def lambda_handler(event, context):

    # all running EC2 instances.
    filters = [{
            'Name': 'tag:AutoStop',
            'Values': ['True']
        },
        {
            'Name': 'instance-state-name',
            'Values': ['running']
        }
    ]

    #filter the instances which are stopped
    instances = ec2.instances.filter(Filters=filters)

    #locate all running instances
    RunningInstances = [instance.id for instance in instances]

    #print the instances for logging purposes
    #print RunningInstances

    if len(RunningInstances) > 0:
        #perform the shutdown
        shuttingDown = ec2.instances.filter(InstanceIds=RunningInstances).stop()
        print(shuttingDown)
    else:
        print("Nothing to see here")
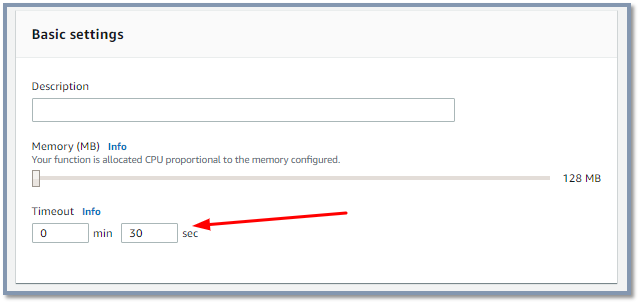
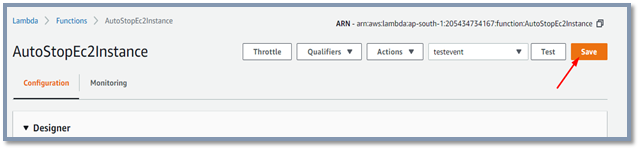
Scroll Down to Basic settings and enter 30 Seconds in Time out.
Rest leave it to the default and click on save top right corner.
Click on services then Lambda
Click on Create new function.
Then Select Author from scratch
Under Basic information tab enter Function Name as AutoStopEC2Instance and select runtime as Python 3.7.
Click on Choose or create an execution role to expand.
Under Execution role select Use an Existing Role and select the role lambda_stop_start_ec2 which we have created in previous step and click on Create function.
Lambda Designer will open scroll down where you can find Function Code.
Under Function code you will find an inline editor with lambda_function.py. Delete the content of the file and paste below code.
Note: For region, replace “ap-southeast-1” with the AWS Region your instances are in
1 | import boto3 |
Scroll Down to Basic settings and enter 30 Seconds in Time out.
Rest leave it to the default and click on save top right corner.
Testing Stop Lambda function
- Now scroll to the top of the page and click on Test button (Top right corner)
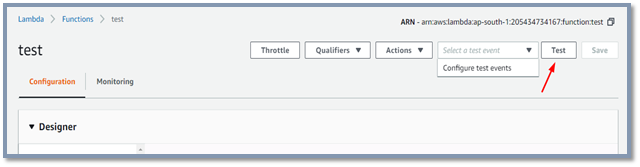
First time it will ask you to configure test event. Select Create new test event and Event template as Hello World & Event Name as anything you prefer.
Ex:TestEC2Stop and click on Create. It will create the test event.
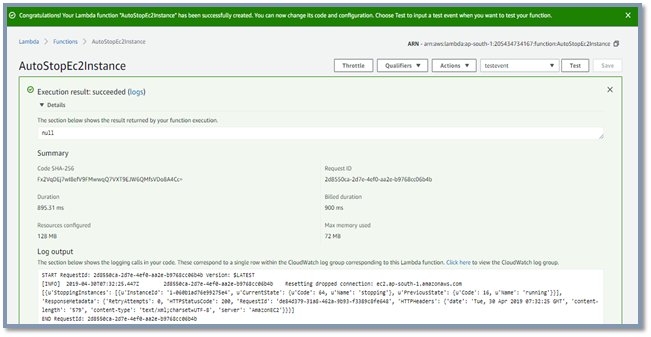
Now select the test event and click on Test. You will get the output as (Execution result: succeeded(logs)) means your lambda function is working. You can now check the ec2 console where you can see the tagged instance has stopped.
First time it will ask you to configure test event. Select Create new test event and Event template as Hello World & Event Name as anything you prefer.
Ex:TestEC2Stop and click on Create. It will create the test event.
Now select the test event and click on Test. You will get the output as (Execution result: succeeded(logs)) means your lambda function is working. You can now check the ec2 console where you can see the tagged instance has stopped.
Create Lambda function to Stop Instance
Click on services then Lambda
Click on Create new function.
Then Select Author from scratch
Under Basic information tab enter Function Name as AutoStopEC2Instance and select runtime as Python 3.7.
Click on Choose or create an execution role to expand.
Under Execution role select Use an Existing Role and select the role lambda_stop_start_ec2 which we have created in previous step and click on Create function.
Lambda Designer will open scroll down where you can find Function Code.
Under Function code you will find an inline editor with lambda_function.py. Delete the content of the file and paste below code.
Note: For region, replace “ap-southeast-1” with the AWS Region your instances are in
1
2
3
4
5
6
7
8
9
10
11
12
13
14
15
16
17
18
19
20
21
22
23
24
25
26
27
28
29
30
31
32
33
34
35
36
37
38
import boto3
import logging

#setup simple logging for INFO
logger = logging.getLogger()
logger.setLevel(logging.INFO)

#define the connection
ec2 = boto3.resource('ec2', region_name='ap-south-1')

def lambda_handler(event, context):

    # all stopped EC2 instances.
    filters = [{
            'Name': 'tag:AutoStart',
            'Values': ['True']
        },
        {
            'Name': 'instance-state-name',
            'Values': ['stopped']
        }
    ]

    #filter the instances
    instances = ec2.instances.filter(Filters=filters)

    #locate all stopped instances
    RunningInstances = [instance.id for instance in instances]


    #print StoppedInstances

    if len(RunningInstances) > 0:
        #perform the startup
        AutoStarting = ec2.instances.filter(InstanceIds=RunningInstances).start()
        print(AutoStarting)
    else:
        print("Nothing to see here")
Scroll Down to Basic settings and enter 30 Seconds in Time out.
Rest leave it to the default and click on save top right corner.
Click on services then Lambda
Click on Create new function.
Then Select Author from scratch
Under Basic information tab enter Function Name as AutoStopEC2Instance and select runtime as Python 3.7.
Click on Choose or create an execution role to expand.
Under Execution role select Use an Existing Role and select the role lambda_stop_start_ec2 which we have created in previous step and click on Create function.
Lambda Designer will open scroll down where you can find Function Code.
Under Function code you will find an inline editor with lambda_function.py. Delete the content of the file and paste below code.
Note: For region, replace “ap-southeast-1” with the AWS Region your instances are in
1 | import boto3 |
Scroll Down to Basic settings and enter 30 Seconds in Time out.
Rest leave it to the default and click on save top right corner.
Testing Start Lambda function
Now scroll to the top of the page and click on Test button (Top right corner)
First time it will ask you to configure test event. Select Create new test event and Event template as Hello World & Event Name as anything you prefer.
Ex:TestEC2Start and click on Create. It will create the test event.
Now select the test event and click on Test. You will get the output as (Execution result: succeeded(logs)) means your lambda function is working. You can now check the ec2 console where you can see the tagged instance has started.
Scheduling auto stop using CloudWatch events
Come back to the lambda functions AutoStopEC2Instance. which we have just created and tested.
On the Lambda Designer tab click on cloudwatch events Add trigger. Then choose EventBridge (CloudWatch Events)
Under rule select Create a new rule
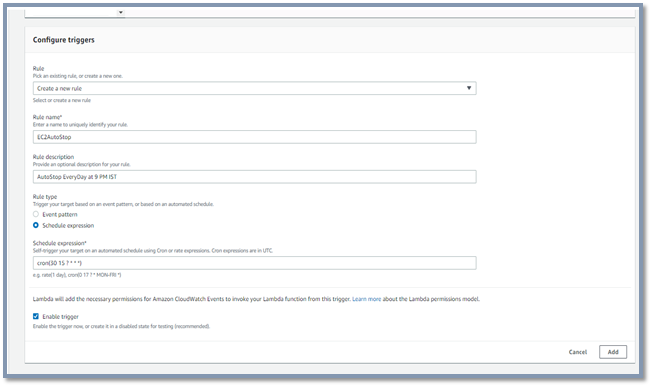
Mention rule name as AutoStopEC2Instance and description of the same
Select rule type Schedule Expression and mention — cron(0 21 ? * * *) – Everday at 9:00 PM UTC. Learn more about AWS Schedule expressions at Learn more about AWS Schedule expressions from here.
Enable Trigger will be already checked as default, If not enable it by check in
Click on add It will show you as new trigger 1 -unsaved changes

- Click Save on top right corner to save the changes.
Come back to the lambda functions AutoStopEC2Instance. which we have just created and tested.
On the Lambda Designer tab click on cloudwatch events Add trigger. Then choose EventBridge (CloudWatch Events)
Under rule select Create a new rule
Mention rule name as AutoStopEC2Instance and description of the same
Select rule type Schedule Expression and mention — cron(0 21 ? * * *) – Everday at 9:00 PM UTC. Learn more about AWS Schedule expressions at Learn more about AWS Schedule expressions from here.
Enable Trigger will be already checked as default, If not enable it by check in
Click on add It will show you as new trigger 1 -unsaved changes
Scheduling auto start using CloudWatch events
Repeat the steps 1 to 5 for another lambda function AutoStopEC2Instance
Select rule type Schedule Expression and mention — cron(0 9 ? * MON-FRI * *) – Everday at 9:00 AM UTC except Saturday & Sunday. Learn more about AWS Schedule expressions from here.
Video Tutorial
You can find the complete video tutorial from this link
Repeat the steps 1 to 5 for another lambda function AutoStopEC2Instance
Select rule type Schedule Expression and mention — cron(0 9 ? * MON-FRI * *) – Everday at 9:00 AM UTC except Saturday & Sunday. Learn more about AWS Schedule expressions from here.


